Applies to BTField version 15.3.38 and onward.
Overview
BTField can exchange data with external GIS tools through three industry‑standard formats:
| Object | Import | Export |
|---|---|---|
| Site polygons (Point / PolyLine / Polygon) | Shapefile, KML, WKT | Shapefile, WKT |
| Survey paths (passed + failed segments per master survey) | — | Shapefile, WKT |
| Inversion result grids | — | GeoTIFF (1‑band values or 3‑band RGB) |
| Polygon colours (per‑polygon overrides + workspace defaults) | — | (persisted in workspace database) |
Format reminders: Shapefile is multi‑file (.shp + .shx + .dbf + optional .prj); WKT is a single tab‑delimited text file; GeoTIFF is a single .tif raster with embedded projection metadata.
Important — BTField’s coordinate assumption
BTField assumes that GPS data is recorded in WGS‑84 latitude / longitude, and that all working coordinates inside a project are WGS‑84 / UTM (the UTM zone and hemisphere stored on the master survey).
This matters whenever you import or export geospatial data:
- BTField never reprojects coordinates. It will read or write whatever numbers are in the file as‑is.
- Choosing a different datum (e.g. NAD83, NAD27) in the CRS picker only changes the
.prjlabel that is written next to your shape file. The Easting/Northing values themselves are still BTField’s working WGS‑84 / UTM numbers. - For sub‑metre work where the distinction between WGS‑84 and NAD83 / NAD83(2011) matters, do the datum conversion in your GIS after export.
- When importing a shape file whose
.prjsays NAD83 (or anything other than WGS‑84 / UTM in your zone), be aware that BTField will use those coordinates verbatim against your WGS‑84 / UTM survey — the two will be offset by up to a metre or two in North America, more in some regions.
The CRS picker shows a warning when the datum/zone you choose differs from the workspace’s, but the warning is informational — it does not trigger a reprojection.
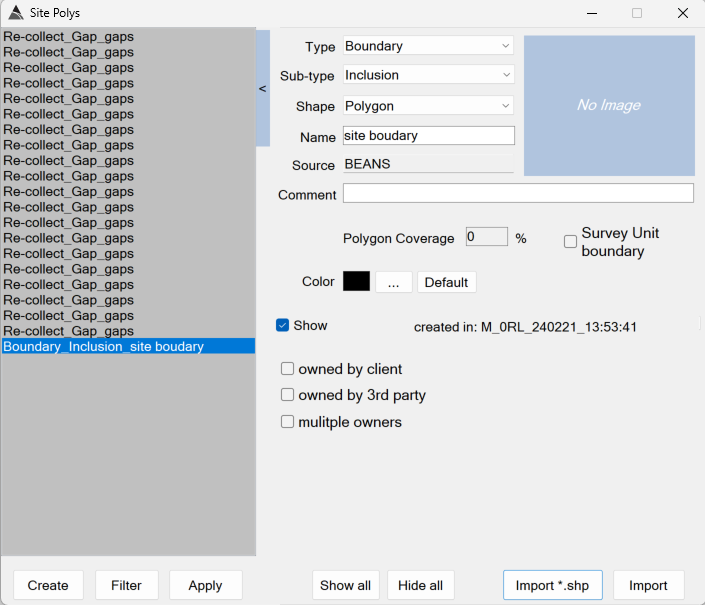
Importing Site Polygons
The Site Polys form’s Import Shape File button opens the Import Site Poly dialog, which lets you tag every imported feature with a default Type, Sub‑type, Name and (optionally) a custom colour.

Form controls
- Shape file to import + … browse — file filter
Shape files (*.shp)|*.shp. - Type — one of Boundary, Obstacle, SurfaceTarget, POI, ReCollect, Transect, SRA.
- Sub‑type — depends on Type.
- Name — base name applied to all imported features. BTField appends per‑feature suffixes automatically.
- Survey Unit boundary checkbox — when ticked, BTField creates one Survey Unit (SU) survey per imported polygon. This is only allowed when Type = Boundary and Sub‑type = Inclusion; otherwise BTField shows “A Survey Unit must be a Boundary type” / “…must be an Inclusion sub-type”. On OK with the checkbox set, BTField asks “A Survey Unit (SU) survey will be created for each polygon that is imported. Do you wish to continue?”
- Color swatch + … (Choose Color) + Default — see Polygon colour customisation. The swatch defaults to the current Type+Sub‑type effective colour and updates live as you change either combo. If you do not press …, the imported polygons inherit the Type+Sub‑type default.
What the import does
The import supports:
- Multi‑part polygons, polylines and points.
- Polygon ring auto‑closure on read.
- Z values are dropped (BTField site polys are 2D).
- Per‑feature attributes are picked up when present in the source DBF: Label, Name, CreatedIn, Type, SubType, Comment, Source.
CRS handling on import
BTField will use the imported coordinates as‑is. It does not reproject (see BTField’s coordinate assumption). If the shape file has a .prj whose WKT differs from the workspace CRS, BTField shows a warning before importing:
The shape file’s CRS (…) differs from the workspace CRS (…). BTField will NOT reproject — coordinates will be imported verbatim. Continue?
(Default = Cancel.) The warning only fires when both the source .prj and a workspace CRS are present; if either is missing the import proceeds silently and coordinates are taken at face value.
Recipe — cued background polygons
For cued surveys, set Type = Re‑collect, Sub‑type = Background area. See also the cued workflow page.
Exporting Site Polygons
Both export formats are launched from the polygon list’s right‑click menu in the Site Polys form. After the user confirms, BTField shows a Save dialog and then the CRS picker (described once below — the same picker is used by every export operation on this page).
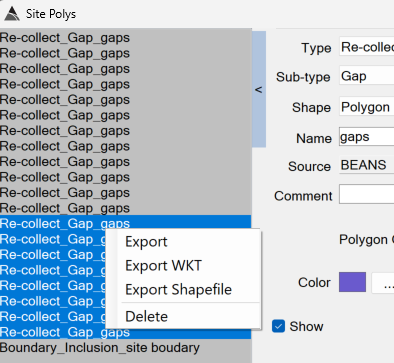
The Export entry that appears alongside Export WKT and Export Shapefile is BTField’s native polygon export (writes the polygons to a folder in the project’s internal format) and is unrelated to the GIS exports documented here.
Choosing the output CRS
The CRS picker is a modal dialog reused for every export operation on this page (site polygon Shapefile/WKT, survey path Shapefile). It does not reproject — it only chooses what .prj text or # CRS: header is written. See BTField’s coordinate assumption for what this means in practice.
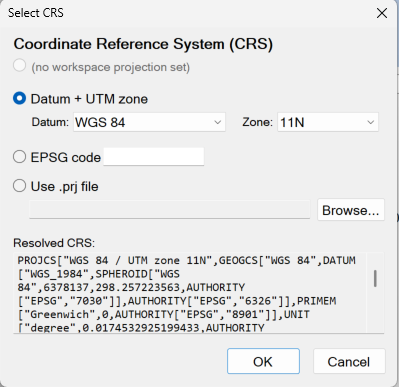
Controls:
- Use workspace projection — default when the workspace has a known projection. Shows the workspace CRS name, or “(no workspace projection set)” when none.
- Datum + UTM zone — pick a datum and zone:
- Datums: WGS 84, NAD83, NAD83(2011), NAD27, ETRS89.
- The Zone combo lists “Geographic (lat/lon)” first, then 1N…60N for all datums.
- 1S…60S is available only for WGS 84.
- NAD83(2011) is restricted to UTM zones 1–19 N.
- Default zone is 10N (Pacific Northwest).
- EPSG code — type any EPSG number. BTField resolves it to a full projection definition.
- Use .prj file — browse for an external
.prj; its contents are loaded verbatim. - Resolved CRS — read‑only multi‑line preview of what will be written.
- OK / Cancel.
When the chosen CRS differs from the workspace CRS, BTField warns on OK:
Selected CRS (…) differs from the workspace CRS (…). BTField will NOT reproject — coordinates will be written verbatim. Continue?
(Default = Cancel.)
Tip — exotic EPSG codes. A small set of exotic EPSG codes may not resolve. In that case provide a
.prjfile via Use .prj file.
Export to Shapefile
- Right‑click the selected polygon(s) → Export Shapefile.
- Confirmation: “Do you wish to export {N} site poly(s) as a shapefile?”
- Save dialog (filter
Shapefile (*.shp)|*.shp). - CRS picker (above).
- BTField writes the shape file.
Mixed‑geometry handling. A shape file holds only one geometry kind. When the selection mixes Points, PolyLines and Polygons, BTField writes up to three sibling files using the suffixes _pt, _ln, _pg (each with its own .shp + .shx + .dbf + .prj). The success dialog lists every file written.
DBF attribute columns:
Label, Name, CreatedIn, Type, SubType, Comment, Source.
Tabs and newlines in attribute strings are replaced with spaces.
Success message: “Shapefile export complete. Wrote {N} file(s): {filenames}”. Failure message: “Error generating shapefile: {message}”.
Export to WKT
- Right‑click the selected polygon(s) → Export WKT.
- Confirmation: “Do you wish to export {N} site poly(s) in WKT format?”
- Save dialog (filter
WKT files (*.wkt)|*.wkt). - CRS picker.
- BTField writes a tab‑delimited file.
File format:
- Optional first line
# CRS: {SrsName}when a non‑default CRS was chosen. - Header row (tab‑separated):
Label⇥Name⇥CreatedIn⇥Type⇥SubType⇥Comment⇥Source⇥WKT. - One row per feature; the
WKTcolumn contains the geometry as a Well‑Known Text string.
Success message: “Successfully generated WKT file.”
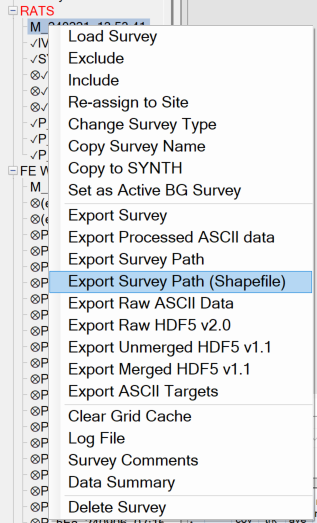
Exporting Survey Paths
A master survey’s right‑click menu offers Export Survey Path (legacy WKT) and Export Survey Path (Shapefile) (new). Both write two files per master survey: a passed file and a failed file. Each row/feature is one segment (LINESTRING); segments are split by the survey’s along‑track spacing MQO.
Common to both formats
- Auto‑naming:
Survey Path Export (passed|failed), {SiteName}, {NumSurv} survey(ies), {ExportIdentity}.{wkt|shp}. - Output folder is selected via a folder browser (not a save‑file dialog). BTField rejects folders that lie inside the BTG workspace folder.
- Geometry source — the last (most‑recently applied) filter state of POS, ATT and EM‑Tx for each vehicle line. In other words: processed/filtered data, not raw acquisition data. This is the same source the legacy WKT export has always used.
- Boundary filtering — only segments whose both endpoints lie inside an inclusion site boundary (and outside every exclusion polygon) qualify. Surveys without any boundary export the full path.
- Per‑segment attributes are identical between the two formats:
area_name,name = {survey}_{vehicle line}_{segment}, start/end UTC, GPS‑fix min/max, Tx current min/max, station spacing min/max/mean, pitch/roll/yaw min/max/mean.
Pre‑conditions
BTField enforces these before letting the export run. If any check fails, you’ll see one of the messages listed:
- Acquisition must not be running.
- An Inversion Results View must be loaded — “You must insert an Inversion Results View first before exporting Survey Paths.”
- No archived surveys in the selection — “You cannot export line paths for excluded surveys. You must include them first.”
- No Function‑Test surveys — “You cannot export Survey Paths for FT surveys.”
- The selection must be all Master or all Survey‑Unit, not mixed.
- Every selected survey must already be processed — “The following surveys have not been processed yet: {list} Surveys must be processed first before exporting the Survey Paths.”
- MQO Limits must be set — “The MQO Limits have not been set yet in the MQO tab.”
WKT (legacy)
WKT export does not prompt for a CRS — the .wkt text file has no projection sidecar. Coordinates are written in the workspace’s working CRS as the path data already lives. Success message: “export of survey paths successful”.
Shapefile (new)
After the pre‑conditions, BTField shows the CRS picker. The default is the WGS 84 / UTM zone matching the master survey’s hemisphere and zone.
Each output is a complete shape file set (.shp + .shx + .dbf + .prj).
When nothing qualifies (typical when no inclusion boundary has been imported yet), BTField shows:
No qualifying survey‑path segments were found to export. This typically means the selected survey(s) had no points inside an inclusion site boundary, or had not yet been processed.
On success: “Export of survey paths (shapefile) successful. Passed segments: {n}. Failed segments: {n}. Wrote: {filenames}”.
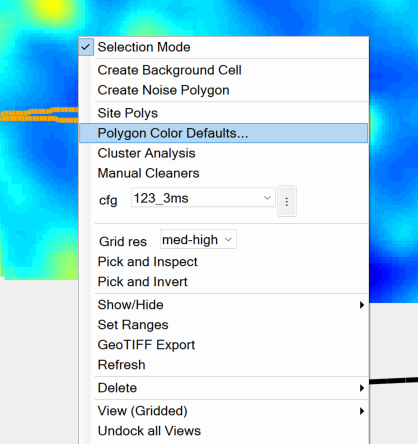
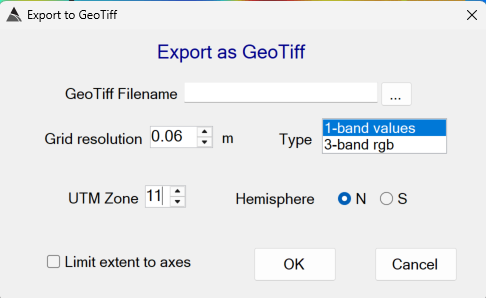
Exporting GeoTIFF Grids
GeoTIFF export turns the active inversion grid into a single‑file .tif raster with embedded UTM projection metadata. It is launched by right‑clicking the grid view and choosing GeoTIFF Export. (The same menu also hosts Polygon Color Defaults… — see Workspace per‑(Type, Sub‑type) defaults.)
Licence gate. GeoTIFF export requires the GeoTiff licence flag. Without it, BTField shows “GeoTiff export is not enabled in BTField {licence‑state}” and the menu item is disabled.
Pre‑conditions
A survey must be loaded and the active grid must be loaded. Otherwise BTField shows “please OPEN or load a survey first”.
Form controls
- GeoTiff Filename + … browse — filter
GeoTiff files (*.tif)|*.tif. If you forget the extension, BTField appends.tifautomatically. - UTM Zone — 1–60. Pre‑filled from the survey’s stored UTM zone when available; otherwise BTField shows “Please note: This survey does not have the UTM zone information. You will need to provide it here.”
- Hemisphere — Northern / Southern radio buttons, also pre‑filled from the survey row when known.
- Grid Resolution (m) — output cell size in metres.
- Output Type:
- 1‑band values — single‑band raster preserving numeric grid values. NoData = 254. Use this for downstream numerical analysis.
- 3‑band rgb — palette‑coloured raster matching BTField’s on‑screen palette exactly. Use this for direct GIS overlay.
- Limit extent to axes — when ticked, only the area currently visible in the Inversion Results View axes is exported; otherwise the full grid is written.
What BTField writes
The output GeoTIFF carries a WGS 84 / UTM projection for the chosen zone and hemisphere.
Status while running: “exporting grid as GeoTiff, please wait…..”. On completion, BTField pops “GeoTiff exported” and writes the same line to the message queue.
Polygon Colour Customisation
Site polygon colours are resolved in three tiers:
- Per‑polygon override — a colour explicitly chosen for that polygon.
- Workspace per‑(Type, Sub‑type) default — a colour chosen in Polygon Color Defaults… for that Type/Sub‑type pair.
- Built‑in fallback — e.g. Boundary/Exclusion → Brown, ReCollect/Background area → RosyBrown, ReCollect/(Gap, other) → SlateBlue, others → Black.
Both the per‑polygon overrides and the workspace defaults are stored in the workspace; opening the workspace on another machine carries them along.
Per‑polygon override
The same Choose / Reset controls appear in two places:
At import time (Import Site Poly form, see the import section):
- The colour swatch starts at the current Type+Sub‑type effective colour and live‑updates as you change either combo.
- Press … to open a colour dialog. The chosen colour is applied to every imported polygon.
- Press Default to clear the choice — imported polygons inherit the Type+Sub‑type default.
On any selected polygon(s) (Site Polys form):
- The swatch + Choose Color / Reset Color buttons sit beside the polygon list.
- Choose Color opens a colour dialog; the chosen colour is applied to every selected polygon.
- Reset Color clears the override on every selected polygon, reverting to the workspace/built‑in default.
- DU master polygons are excluded — both buttons silently no‑op for them.
- After a change, the polygon list, swatch and inversion‑results chart all redraw.
Workspace per‑(Type, Sub‑type) defaults
To change the default colour used for every polygon of a given Type/Sub‑type that does not have its own override, right‑click the grid view and choose Polygon Color Defaults… (see the menu screenshot in the GeoTIFF section).
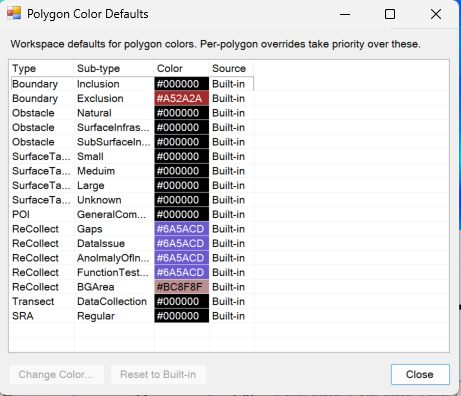
The dialog reminds you of priority:
Workspace defaults for polygon colors. Per‑polygon overrides take priority over these.
The list shows every Type/Sub‑type combination with:
- Type and Sub‑type names.
- Color — hex
#RRGGBB, painted into the cell background; foreground text is auto‑contrasted. - Source — Workspace when a workspace override exists for that pair, Built‑in otherwise.
Buttons:
- Change Color… — opens a colour dialog seeded with the current effective colour. On OK, the new colour is saved and the Source column flips to Workspace.
- Reset to Built‑in — removes the workspace override, reverting to the built‑in default.
- Close — if any change was made, BTField refreshes the chart so new colours show immediately.
Known artefacts and gotchas
- Coordinates are always WGS‑84. BTField assumes GPS data is recorded in WGS‑84 lat/lon and that all working coordinates inside a project are WGS‑84 / UTM. Imports and exports use those numbers verbatim regardless of what the
.prjsays. See BTField’s coordinate assumption. - No reprojection. BTField always writes coordinates verbatim and assumes working coordinates are WGS‑84 / UTM. The chosen CRS only governs the
.prjtext or# CRS:header. To change projection or datum, do it in a desktop GIS after export. - Exotic EPSG codes. A small number of exotic EPSG codes may not resolve. Use Use .prj file in the CRS picker when this happens.
- Survey‑path geometry source. “Processed” (last‑filter‑state) data is exported, never raw acquisition data. Same as legacy WKT.
- GeoTIFF licence. Without the GeoTiff licence flag the menu item is disabled.